Thursday 20 December 2012

Interior Location Brief Evaluation

For this project I chose to photograph things in my home. Objects that I see everyday. These are the little quirks that I like about my home and give it character. Little things that I would probably remember about 'Mum and Dad's house' when I'm old and grey!
When I told people what I was planning on doing for this project, they thought it was a lazy choice but I found it quite difficult! My house is quite dark and cosy so it was a challenge to get the exposure I wanted. Also, I think that 'home' is a nice subject and you HAVE to photograph it at some point for memories!
I concentrated quite a lot on composition and the use of space to create a beautiful picture. Also, I considered depth of field quite a lot too. I de-saturated some of the images a swell because I thought it gave quite a peaceful and delicate feel rather than loud and lively as I feel my home is quite a peaceful place. I used a tripod for most of these images.


This is a little ledge at the top of a wall in my kitchen with some quite old fashioned kitchen items on it. I thought it would be interesting to photograph. I think the texture in the ceiling works well with what I was trying to achieve with the space.
In terms of composition in this image, I havn't quite stuck to the 'rule of thirds'. The objects on the shelf at the bottom take up a little bit less space than a third. I did this purposely as I think it makes the image a lot more interesting even though it is simplistic.


I tried to achieve a similar composition with this one to the one above. In my house we have lots of random objects and orniments dotted about. This is some artificial gold grapes on a gold plate (random), on a chest of drawers under our stair case. I am really happy with the way the wood has come out and the colours. I changed the white balance to cloudy as this adds warmth. 


This is a random candle holder on the floor. I didn't move anything or stage anything during this shoot. I just moved my position and angle to get the framing i wanted and to get the composition I wanted. The majority of this image is just space on the left hand side. If i'd have take the photo so that the object was in the middle, it would have been a lot less interesting and effective. 


These are on top of a wardrobe upstairs just below a velux. You can see the natural light from the window coming through. Again, i have framed it so that the object is to one side and the other side is space. 


Originally, i took this photo with the lights on in my porch and I was quite happy with it but when i turned the lights off, i noticed the shadows of the glass door on the walls because my dad was watching TV in the other room and the light from it was flickering through onto the walls. So i stayed there with my tripod, adjusted to a slow shutter speed and took the photo again. I thought this image with the shadows was a lot better. This one reminds me of a Jessica Backhaus photograph.


I couldn't not choose this one to be included in my final 10 images. This is just one of the typical characteristics of my house. My mum likes to put quirky little figures in random places. I selected a wide aperture for this image to get that shallow depth of field. I like that the focus is just on the little guy at the front and his smile.


Using a wide aperture again to get that shallow depth of field, focusing on the candle at the front and then gradually going out of focus towards the fire in the background. I like the warmth of this image however, if i was to do it again, i would have tried to get the logs at the side of the fire in the frame and maybe try to get it a little bit brighter.


A walking stick on the stair case. This was quite a dark area so I had to bump up the ISO to 1600. Because of this, I began to get a little bit of noise on the background so I tweeked the noise reduction in Adobe RAW a little bit.


A traditional doorbell. One of the things that adds to the character of my house. This one also needed noise reduction.


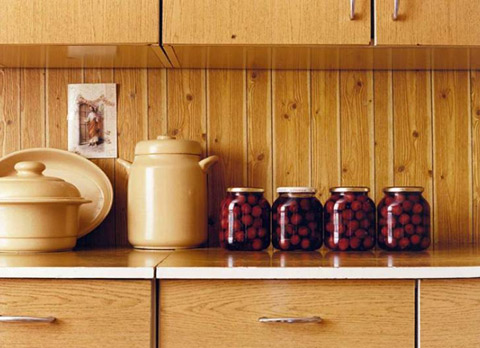
Jessica Backhaus also takes photographs around her house and others' houses and one of them is of a kitchen work top with jars etc. This is an image from my kitchen worktop. I just like the contrast of the red against the black and neutral tiles. I intended for this to be quite symmetrical and the rule of thirds comes into this image as well.


After completing my work and seeing everyone else's in the class, I wonder if maybe I could have chosen a more interesting subject matter. However, I found that it was quite a challenge to create a good image out of something quite mundane.   


Friday 14 December 2012

Macro & Close up

Macro photography is mostly used when photographing wildlife, nature and for scientific purposes. It is extreme close up photography, usually of very small subjects such as insects or flowers. The size of the subject in the photograph becomes alot bigger than life size.


Close up shots (not neccessarily macro) are also used for more abstract and artistic photography. Close ups display detail, show texture, create abstraction, offers a new viewpoint and perspective, indicate importance and can also change meaning.


Viewpoint

Before mid 19th century, art was representational and formal. When photography was invented, this wasn't the case. Photographers were more creative and experimental with viewpoint; different camera heights, angles and more daring crops. This was easier to do for photographers as photography is much more mobile than painting, however, painters were influenced by this and began to paint more spontaneously.
 
 
Richard set us the task of going out and taking some snaps that considered viewpoint and how it can change the feel and meaning of an image. This is one of the images i took. I had to lie on the ground to capture it from this angle!
 
 
This image has a total different affect than it would if i was to take it from a different angle e.g. from above or head on. Because of the viewpoint, this image is alot more dramatic and it gives a sense of power! A powerful letterbox!!!


Thursday 13 December 2012

Interior Brief - Photographers - Jessica Backhaus


Jessica Backhaus is a German photographer born in 1970. She studied visual communication and photography and worked as a picture editor.
 
I have chosen these images of hers for inspiration for my interior location brief. Backhaus focuses on easily missed details and quiet moments which is something I like to do myself as I mentioned in the 'Everyday' post. 


I think these images are very gentle and intimate. I love the delicate colours.

Thursday 6 December 2012

"Everyday" (interior brief)

Photographing the "everyday" is something I am really interested in and something I am thinking about looking at for the interior location brief. To photograph the "everyday" is to look at things in everyday life that people wouldn't usually tend to look at. Objects or scenes that are usually looked at as mundane or ordinary. Nothing is staged, but it is all about finding the extraordinary in the ordinary. I love this idea because you can really take something quite boring and look at it in a totally different way and then force the viewer to see it in this way too. I think one of the most important aspects is viewpoint and composition as these things can really change the way people see things.
 
 
William Eggleston is a good example....


William Eggleston (born July 27, 1939), is an American photographer. He is widely known for the recognition of colour photography as a legitimate artistic medium to display in art galleries.

Surrealism

Surrealism is a cultural movement that began in the 1920s. It is an expression of imagination as revealed in dreams and is free from convention. Surrealist images contain an element of surprise and unexpected juxtapositions. The leader of the surrealism movement was Andre Breton, a french writer and poet.
 
Surrealist photographers include:


Brassai


Henri-Cartier Bresson


Man Ray


I enjoy surreal photography as I like anything with a bizarre style. I think it's a good way of pushing the limits of the imagination and bringing out creativity through photography.

Studio Photography - shooting glass against black & white backgrounds

During this lesson with John, we experimented with shooting glass objects on a white background and then a black background. We concentrated on using studio lighting to make the objects stand out.
 
 
This was mine and Andy's set for shooting on a white background. We used a backlight behind the white, a soft box and a deep reflector with barn doors. We put some black tape on the soft box to break up the reflection of the light on the glass. We also used black card around and above the glass so that the black would reflect onto it, making it stand out against the white background.


This was our setup for the black background. We used 2 soft boxes and a glass surface to place the subjects onto. The reflection of the objects on the glass surface works really well against a black background.


Friday 30 November 2012

Studio Photography - Still Life


John set us the task of bringing in textured objects that we could make still life arrangements out of and then photograph with his Mamiya medium format digital camera (which is a gorgeous camera by the way!).
 
I used a soft box on the side, which gives a soft diffused light and spreads it evenly, and a deep reflector with the barn door accesory behind the arrangement to bring out the textures in the subject. Reflective card is also useful when doing still life photography to highlight areas that are hard to get to.


I chose to photograph a large sea shell i've had on my shelf for years and some pebbles. I asked a fellow student to hold a piece of gold reflective card just infront of it so that I could capture the detail in the wood beneath the shell because without the card, the detail was lost and looked too dark. 


I then went outside and had a look round the college grounds to find more things to photograph. I picked a sprig of Holly, some bark and some small bits of tree branch to make a christmassy still life arrangement! I used the gold card again but maybe should have positioned it a little closer as the detail below the bark is lost.

Thursday 29 November 2012

Evaluating Exterior Location Brief


 I have completed my 10 images for the exterior brief. My subject is water and reflections. You might notice that I have a mixture of black and white and colour images. I chose not to do them all in colour, simply because some worked better in black and white. I aimed for my images to provoke certain moods and the colours really help with this. Most of the images I intended to look quite abstract like some of the photographers work I have looked at. I am really interested in making photographs look painterly and distorted. Some of the images will be displayed upside down so that the reflections are the right way up. Throughout the series, i have concentrated on both cold and warm colours. I think they have a calming and serene feel to them. During this project, one of the photographers I was inspired by was Juma Puranen. I was really interested in his technique so I experimented with using transparent materials inbetween the camera and the subject. I only chose 2 images from doing this to use in my final 10 images. 

This is a rotated image of a reflection. I think its quite abstract. I like the green colours and the lines.

The colours and tones in this image remind me of Rinko Kawauchi's work. Also the shallow depth of field reminds me of her work. I decided to focus on the greeny yellow leaves in the foreground rather than the reflections in the water in the background. 


This is an image (above) inspired by Jorma Puranen as I mentioned earlier. I used a piece of glass (after spraying with water) infront of my lens. Puranen likes to prevent direct admiration of landscapes by putting something in between the viewer and the subject.  I chose black and white for this image because i thought it worked a lot better and gives it a sombre mood.


This is another image that I have decided to display upside down. I like the sun shining through the trees in the reflection and i like how there is a mixture of actual twigs and branches in the foreground and refections of them in the background.

Again, a rotated image so that the reflection of the tree is the right way up. This is how it would be displayed. 

This is another Jorma Puranen inspired image, using the wet glass infront of the lens. I kept this one in colour because the different tones on the leaves combined with the water on the glass gives a nice painterly effect.


This is the image that i should have printed off but ended up printing the wrong one which is a similar image. I got confused with the file numbers so in future, i will give the files different names! 


This is the one i printed. The reflections in this one aren't as clear and aren't as prominent as they are in the other image. 


Sunday 25 November 2012

Studio Photography - High Key & Low Key lighting


Low key

Low key lighting is on a black background and uses only one main light . It accentuates the contours of a surface so it is often used when photographing men as it is quite flattering for a man to look quite 'rugged'. Here is an example i shot of Andy. I used one main light (a reflector) at one side of him, with 2 black boards in front of the light leaving a small gap in between them to let the small stream of light through. Its quite a moody and masculine light.


I will use this image as part of my submission because I like how just one side of his face is lit and the other side shows the texture and expression in this face due to the shadows created. I do really like the expression on his face. Andy isn't usually very comfortable at all in front of the camera and usually does a silly face to try and cover up his embarrassment, but I think I captured a very natural expression here which shows the real Andy. 


High Key

Hight key lighting is a lot more fun and lively and usually would require a 3 light setup, a white background and possibly a reflector to illuminate any shadows. This is very flattering lighting for women......but I used Andy again for this example. I also bumped up the contrast for this image.


Film Noir

Film noir is a  term used primarily to describe stylish Hollywood crime dramas.  It uses low key lighting with shadows to build narrative. 


For this image, I used the same lighting as the low key lighting, but this time, added a light with a honeycomb at the back pointing towards the black sheet at the back. A hammer was held infront of the light to create the shadow.


Tuesday 20 November 2012

Studio Photography - Lighting

In our first session on studio photography, we were introduced to different lights and accessories that are used in a studio setup. We got in the studio and took a few shots of each other to see the difference between the different lights and accessories and discussed the possible uses for each of them.


My main model was Andy.......He definately prefers being BEHIND the camera........
Soft box
A soft box is an enclosure around the bulb made up of reflective side and back walls and a diffusing material at the front of the light. This modifies the hard light coming from the bulb and spreads it across the front panel, creating an even and diffused light. As the light is coming from a much larger source and not the small bulb, it gives a much softer light with less shadows. The soft box is used for portraits and fashion photography as the light is very flattering and gives a broad illumination.
Beauty dish

The beauty dish isn't as soft as a soft box but is still one of the softer lights. It gives a dramatic light that wraps around the subjects face. A beauty dish is used in portrait and fashion photography to generate a concentrated pool of light and produce its characteristic round catch light in the subject’s eyes.


Deep reflector   A deep reflector gives off a stronger light and gives more contrast. The inside of the deep reflector is shiny silver so gives a stronger effect than a mid reflector.


                Snoot

A snoot is a tube that fits over a studio light and allows the photographer to control the direction of the light beam. It concentrates the light through the small opening at the front allowing no light to come out sideways. The snoot gives a more concentrated and harsh source of light and can isolate a subject when using a flash. They are useful when shooting still life.
Umbrella with spill kill
 
 
When using a reflective umbrella, the lamp is positioned facing away from the subject, it shoots into the umbrella and the light is then reflected towards the subject.